Art Director & Supervision
The Slap-Comp Guide
A mighty Fish Tank

Watch on Vimeo!
Creating a mighty fine looking fishtank in BMD Fusion 9 & Fusion 16
Ahoy, me hearties! You have come here because you want to learn and create yourself a fine-looking mighty fish tank, or simply speaking, a cube. Well then, let's see what the Pirates of ConFusion have plundered this time... yaaaarr!
This is a guide to the Slap-Comp released on my Patreon. Slap-Comps are usually maximum Full HD. In this case, because the subject is rather small, it is difficult to avoid anti-aliasing artifacts, especially with SSAO and Volume Fogs. Those artifacts would be diminished when working in double resolution and only resizing for final output.
Before we dive in, it is a good idea to familiarize yourself with some PoC terminology:
PoC
Pirates of ConFusion. A horde of creative pirates looking for less confusion and perhaps a little more enlightenment.
Rum Flow
This is the area in Fusion where you connect nodes. The normal people call it "flow".
Blow your Flow
When using too many nodes for something that could be done with less nodes.
Slap-Comp
A comp that happened by accident. Usually done quickly without going into time costly details. Sort of like a proof of concept.
Scallywag
A villainous person, or useless pixels/nodes and whatnot.
Shiver me Timbers
Expression of surprise.
Booty
Treasure or something incredibly useful.
Swag
Pure awesomeness or cool.
The seven seas
Refering to the vast ocean of knowledge and information that needs to explored, plundered and brought to the people.
Saucy
Well, simply sexy
Voodoo
Something beyond comprehension.
Let's dive in!
Be warned, this is not a Fusion beginner tutorial, nor is it, as they promise, a "Master Fusion" or a "from zero to hero" bait-and-switch. However, even beginners will pick up some great tips for sure. There is quite a lot going on here, and it might look daunting to the new Fusion artist, but you will eventually get it. If you want to follow along and haven't installed Fusion, head over to https://www.blackmagicdesign.com/support/family/davinci-resolve-and-fusion and do so. The free version will work just fine (with the new release, the free version of Fusion will only be available in DaVinci Resolve Free).
AVAST! A first test showed a crazy speed increase in Fusion 16. Just saying.
Overview
As a Pirate, it is always a good idea to peak through the spyglass and see where you are heading to. Below you see the Rum-Flow.
If you watched my vast Fusion 9 course LeBucksRing, you will already be familiar with my workflow. See the individual sections. Always check out the navigator in the screenshots to know where I am. We will be moving from left to right. Additionally, I have provided you a comp to download for each part, so that the apprentice can slowly groove in :


The cube
Props
Corals
Wireless Camera
Comp
Cube-ish
Render me Timbers!
Our first render element! Doesn't look too impressive, does it?

A cube has 6 sides, one would think...
The advantage of Fusion's Cube3D:
-
Individual Materials for each side of the cube.
-
This is saucy because it allows you to even blend out sides you don't need.
-
Color each side differently to use it as an RGB mask and perhaps even more.
-
Assign different Material IDs to each side to use with Material-ID 's AUX channels

Shiver me Timbers: Unfortunately it seems that the Cube's Material ID's AUX doesn't work due to a bug
Moving on, I created the water tank. I decided on two basic elements. The front walls and the top for the water surface. However, while writing this guide I could organize my thoughts, optimize here and there and eventually took a slightly different approach.

I've created an extended water surface element, merged it using the Atop operation (more on this later), and an additional mask to cut away the remaining bits. This way we ensure that the water surface always fits. The wave effect around the walls we will do later using a 2D displacement. That way we can add additional swag, sticking nicely to the waves.

The materials for each element are ridiculously simple and grouped above the Cubes.

Rope-less or...wireless
After each Renderer you will spot some fancy colored nodes. These are wireless nodes. I like to name them:
OUT_where is my Rum ( The one that goes into the Wireless node)
IN_Here it is Captain ( The one that goes out into the wide world )
I used them a lot to avoid drunken Spider-Man action. Note that the wireless node needs to be copy/pasted as an instance. Also it is not clear whether it is better to always copy the main wireless node. I feel plagued with scurvy copying an instanced instance of an instanced instance. So to be safe I always copy the original wireless node.

Water foam-ish
Render me Timbers!
The Foam Element


To replace or not to replace..that's the question.
Now let's talk about the first special technique here. Again, check out the navigator to see where I am fooling around.
You see that I replace the material of our water surface with some foam like texture. The problem is that if I would simply replace it, it would put the texture on all sides reveling our previously hidden sides. To avoid that you can set the Alpha Mode to Keep in the Replace node. Now at first you might think that this looks strange, but it is important to have a closer look at the Alpha. Press A inside the viewer and see that it only shows the top surface.
That's good , because if we later add an AlphaMultiply/Divide node, it will through the scallywags off the ship, so to speak. Now because I changed my approach, this becomes obsolete as I am now using a mask anyway. I think this Replace/KeepAlpha method is very useful though, so I share it with you.

RGB Mask
Render me Timbers!
The RGB Mask Element

See Part02 comp
What is Red, Green, and Blue?
Well, blue is someone who had the right amount of rum. The next render element is a RGB mask for our Cube.
I was expecting to use this much more but ended up using the water surface element itself as a mask as it was near by.
Nonetheless I used this RGB mask for the sides. RGB masks are very useful in a sense that you can use the bitmaps native channel selection for R, G, B without any anti-aliasing artifacts.

Without and with AlphaDivide

Choosing the red side
Bubble-ish
Render me Timbers!
The Bubbles Element!

Oh well, those fine looking mighty bubbles must be coming from the rum.
Bubbles are screaming to be done using Fusion's Particle System. In fact, if you use the pEmitter's style in Brush-Mode, it will have a rum bubble preset waiting for you. Although I barely use brushes, they are perfect for this kind of distance to the camera. Other than that, nothing really special going on here.

Water splashes
Render me Timbers!
The Wave-Splashes Element
You ought to add some production value!
This is going to be a little of an adventure. The waves splashing against the glass walls are so saucy, it gives that whole thing there some "Production Value" one might say. It is actually quite simple to do, and you will find that sometimes you don't need to fire up the "Houdini" cannons. On the right you can see how the stream for the water splashes looks like.
Let's take a look at each Particle node:


A horizontal wish wash..
..falling into the abyss

Harrr..not anymore you... scurvy...
First, a pEmitter with a simple pTurbulence. The key here is to make the pEmitter's Number animated as seen on the left top (Spline Editor)

Adding a directional force

Adding a pFriction and a pBounce

Perhaps a little more bit more jumpy?
Give 'em Rum, and they'll jump...

..and bubble!

Adding extra turbo!

Add some Vortex!

And finally some pSpawn!

Key here is to delay birth by cranking StartAge up. Also I reduced the Probability because even with minimal Number, there were too many Particles. You cannot set pSpawn number below 1.0.
Now if you would render it, it would look like this. For our little cube it would probably be enough to render this with some motion blur.

However, I want to show you what you can do with some Rum and some extra love.

So how did I do this. First I used a CopyAux node* to extract the Velocity channel into the RGB channel. Doing so allows me to FrameAverage it because it was too tensed and wobbly. I told it to relax, but it just didn't.
The FrameAverage is very useful to get rid of flicker such as seen in GI passes.
Next I applied a VectorDistortion. You could probably also use a VectorMotionBlur. After that I did something which I want to put into the "voodoo"category, as most people probably never gonna use it. I used a PseudoColor node to cycle through the colors in a way that would cause some very bright areas to pop out. Those bright sparks will make it look like reflections. Well, don't ask me how I came up with this.

*only available in Fusion Studio. If you are on the free version use a Boolean Tool instead.
When working with Particles, it is a good idea to cache the particles to disk. This also help increase performance when scrubbing through the timeline. You can do that by right clicking on the node, then Cache to Disk.
Rum
Render me Timbers!
The empty rum barrel!

Something is afloat...
For the barrel I used an asset available through Reactor, created by the great royal SirEdric. I wasn't looking for a super awesome barrel model. I could have probably created it from scratch with less nodes but less procedural. Just wanted to give a try. So here it goes.
When something is submerging into water, I like splitting the setup into two elements:
-
The whole barrel,
-
and the part beneath the water surface.
But how do we get the submerged portion only? By using matte objects. In this case the water surface becomes a matte using an Override3D node.

Note that by default you don't see matte objects unless you turn them on. When turned on, mattes are displayed as grey. To turn them on, right click in the viewport!
A wishlist bottle to BMD:
For these scenarios and more, a matte object with inverted effect would be saucy. Basically it wouldn't occlude what is behind, but in front of the matte object.
The resulting elements:

But, we need to bring this further!
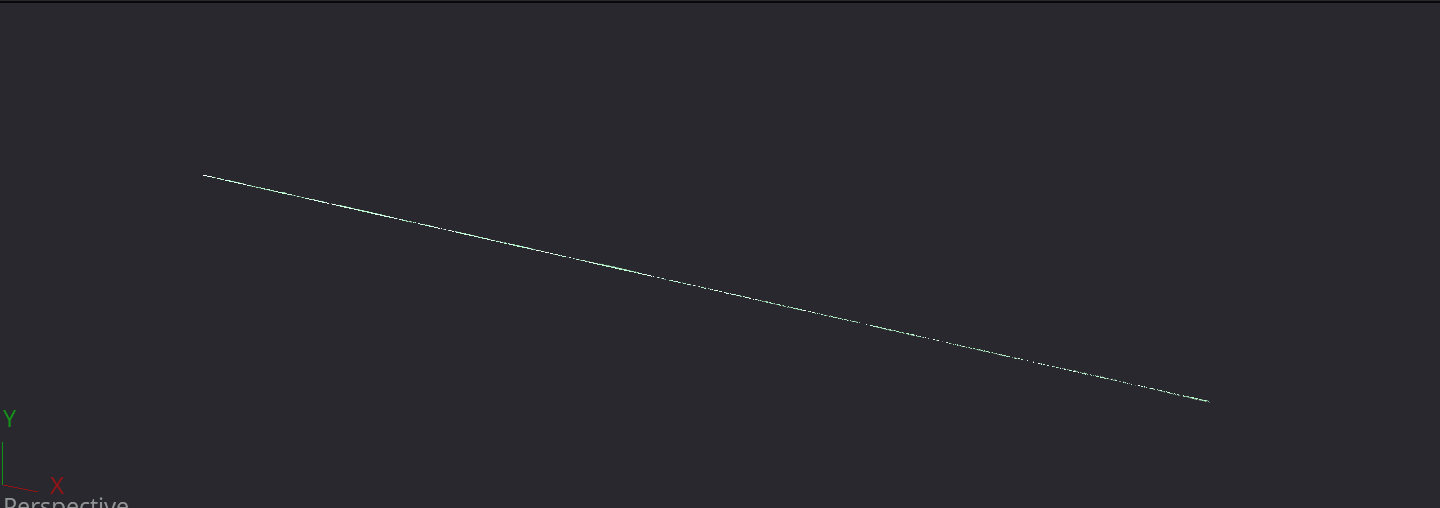
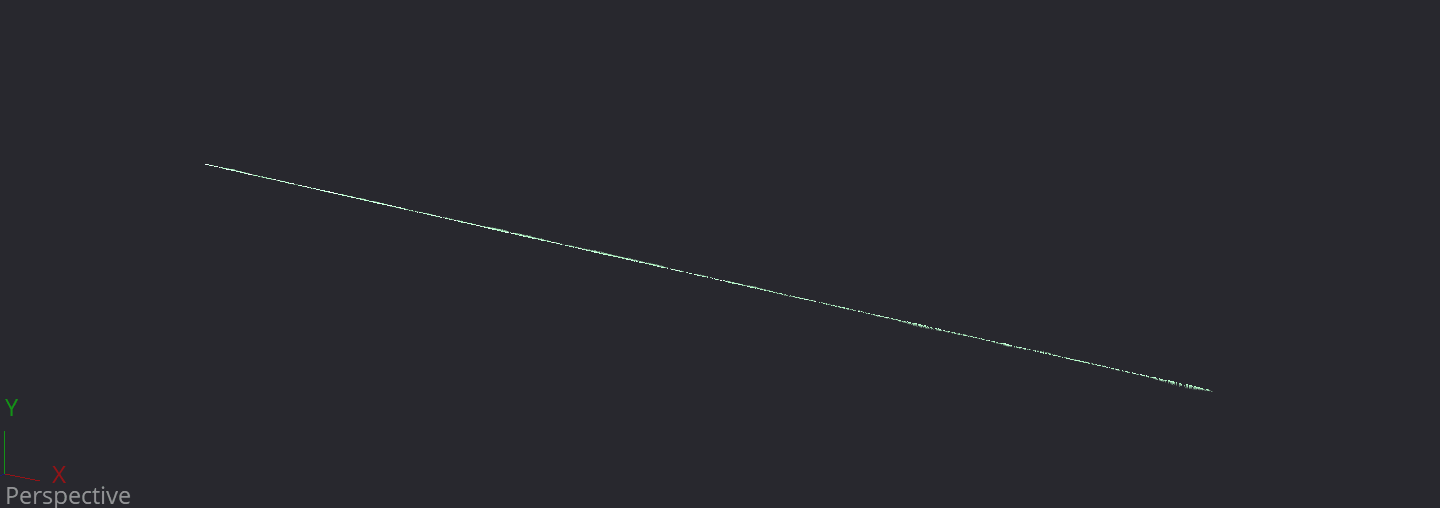
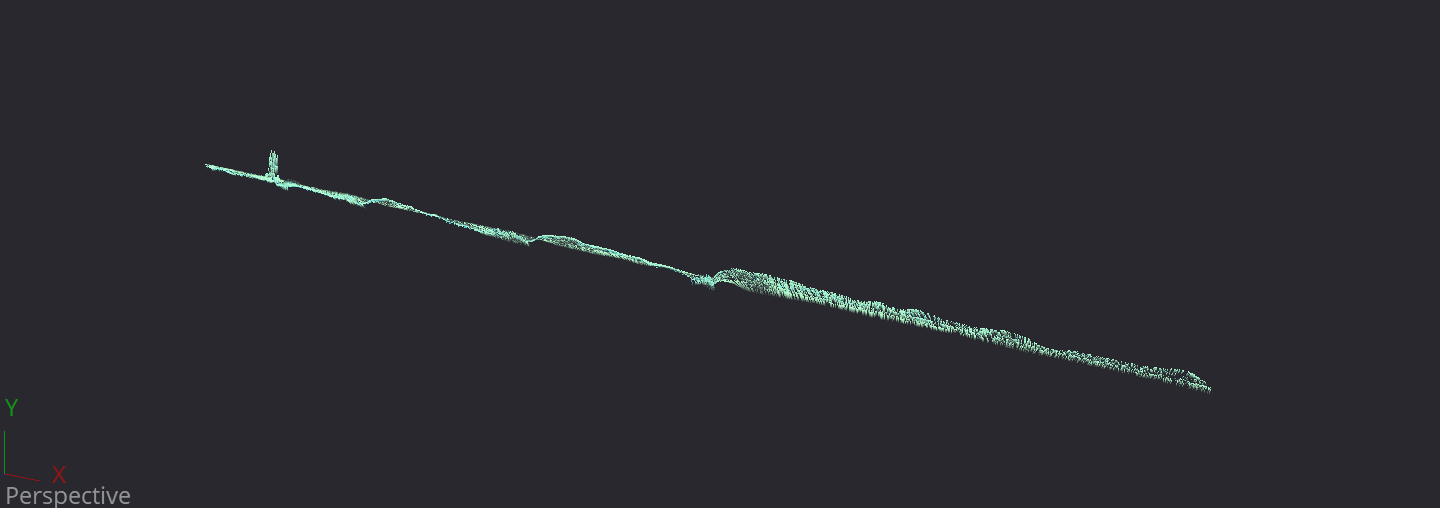
An important detail of objects floating on water is the surface tension. This is where the water bulges up and down causing the reflection of light. It will appear as a bright line as you can see in the classic needle example here:


STEAK UNDER WATER
We Suck Less
*Reactor is a Plug-in for Fusion that brings all Fusion scripts, fuses and macros at your fingertips. But it can do much more. It was created by the might Fusion Pirates on the WSL Ship (WeSuckLess), moderated by my almighty friend SecondMan. Reactor is the best thing since sliced bread, so to speak. Definitely check it out. Because you know, if you wanna do Fusion, you will need a Reactor first.

Rocks
Render me Timbers!
The Rocks Element!

Where there are rocks, there is booty!
The rocks were basically done using the same setup as the barrel. Note that I use displace mode RGB instead of greyscale. This gives you more control on how you want the rocks to form. The blue PointLight is what makes this ordinary rock a mighty rock. This time, to fake the reflection, I used a Transform3D and scaled the rock to -1 along the Y axis. Pretty effective, and the Pirate way one might say. It makes the whole VariRumBlur and Displace process a little easier.
Instead of using Fusion's Matte object, we can now use the upper rock to cut away portions of the mirrored rock.
I always cut with a Boolean node set to Clear.

Corals
If the Corals live, we live.
For the corals and the rest of render elements it should be pretty straight forward from looking at the Slap-Comp. For the riff and corals I used a displaced and deformed plane. I then scattered coral objects using Fusion's Replicate3D tool. Then I rendered it out and applied a combination of SSAOs and Fusion's mighty VolumeFog tool to make it look saucy (almost). A very crucial element are the caustics. To fake caustics you can use the Projector3D with a bunch of filthy noises.
You can also use a camera3D to do projections.
Did you know..
The most important element is the RAW Light element. I have adjusted the shadow density just enough to suggest bouncing light illuminating the shadow. Note that in Fusion only Spotlights currently support shadows. Furthermore, Soft-shadows are only supported if Renderer is set to Software mode.


If your light doesn't seem to cast a shadow despite being turned on in the Spotlight and the Renderer, increase the Spotlight's distance to the object till the shadow appears.
The coral render elements

DIFFUSE

SSAO

CAUSTICS

VOLUME

RAW Light

COMBINED
The compositing
Before we go through the compositing let me get a few things straight.
Add Rum with Boolean! The Pirate way!
Although you can do an ADD operation using the Merge node, the technical correct way is using that Boolean tool. Get used to it!
Whatever you do, keep an eye on your ALPHA channel! The Boolean tool will keep you AUX channels.
1+1 is not 2...but it should
You don't have to understand it, but you ought to be doing it. Before doing operations that alter colors in one way or another, you must Divide your Image by the Alpha. This way, simply speaking, you will avoid your edges from being falsely altered, resulting is the infamous hallow lines around your image. So keep an eye on the Color Corrector, Brightness/Contrasts even the Gamut, you name it.
If you want to understand the math behind it, watch my video on YouTube


Aflaot...wait..Atop
One thing that many people overlook is the operation inside the Merge node. It allows you to merge on top of other images without the need to use masking. These are basic compositing techniques and I recommend you to read the book "The Art and Science of Digital Compositing" It is the bible for every Pirate out there.

Ready for the full Slap?
Adding the foam and glints

After adding the foam/glint element I wasn't quite happy how it looked. Sometimes, as Bob Ross would say, happy accidents happen. When I turned off HiQ mode, I noticed that it gave the effect I was after. Nice crisp white speckles, almost like Rum seeping through a Pirate's teeths. Which also make Fusion's Highlight tool kick in even better. But how do you mimic the LowQuality effect in HiQ mode? Well, you don't exactly need to mimic it because it would mean no sampling. Perhaps Fusion 16's new Multi-sampling can help with that? A simple Brighness/Contrast with a slight sharpen will do just fine. Just make sure you clip the Blacks in the Brightness/Contrast.

HiQ without any changes

HiQ off

Bob Rossified

Mother of Displacement
A crucial element is the Displace tool which I named "DisplaceMom". DisplaceMom, has to give birth to identical twins. I colored them pink so I know exactly where the twins are. Actually it's not twins. I haven't count and don't intend to. Anyway, that Displace node and the Noise it uses to drive it, are copied as instances. This is crucial as it will affect all the masks and other elements.
A superstar
Glints are very typical for a water surface. For that I add the Highlight tool right after the Displace. Now I gotta be honest with you. This is not the place to be, technically. Highlights is a post effect and should therefore like a superstar come at the end of the party. But, in this particular case, it will not only do just fine, it will also save nodes, and keep the flow nice & clean. And as I always like to say, avoid blowing your flow! Note that the Highlight's effect blend is reduced.


KISS
How to make the corals seen through the water surface? I could do a crazy setup here but I get this satisfaction when I can achieve believable results with a ridiculously simple approach. The Motown principle...KISS...comes to mind. Keep it Simple Stupid!
What I did was, take the coral element, and use the Dent tool to distort it in a way that it looks like a horizontal surface. It's a bit tricky, but I felt it was giving the right impression. The dent is restricted with the DisplaceMom mask.

Then I added an additional displace driven by the waves to suggest water refraction. This causes the edges to be a little nasty, so I wanted to blur them. An old Pirate saying:"If you don't know how to fix it, blur it away with some Rum". But at this distant it will not be a problem

Pirates don't follow rules..
they break them
The most saucy trick here is probably the usage of the CleanPlate node to extend edges. Yes, it is meant to be used for your green-screen, but what keeps you from using it for other stuff? Take a look at what the VariBlur node does to the edges of the Cube. There are other ways how you could fix this but I felt I wanted to show you the CleanPlate trick. So first I use the CleanPlate to extend the edges,then I VariRumBlur it, and simply multiply the original alpha back using the good old matey, MatteControl.


KISS again
Though self-explanatory, let me show you again how simple methods can have a dramatic impact. We want to suggest that light is coming from the top. So a simple circular gain reduction will do magic, so to speak.

Wanna see one more? Come closer! Take a look at the bottom. A simple darkening there, gives the impression of contact

Again make sure to check Pre-Divide/Post-Multiply. On the right you see the difference with and without Pre-Divide/Post-Multiply checked.


There, your saucy cube.
If you haven't already, join the mighty Pirates on Patreon
Or pray to the Fusion Gods at WSL
LeBuck
Captain